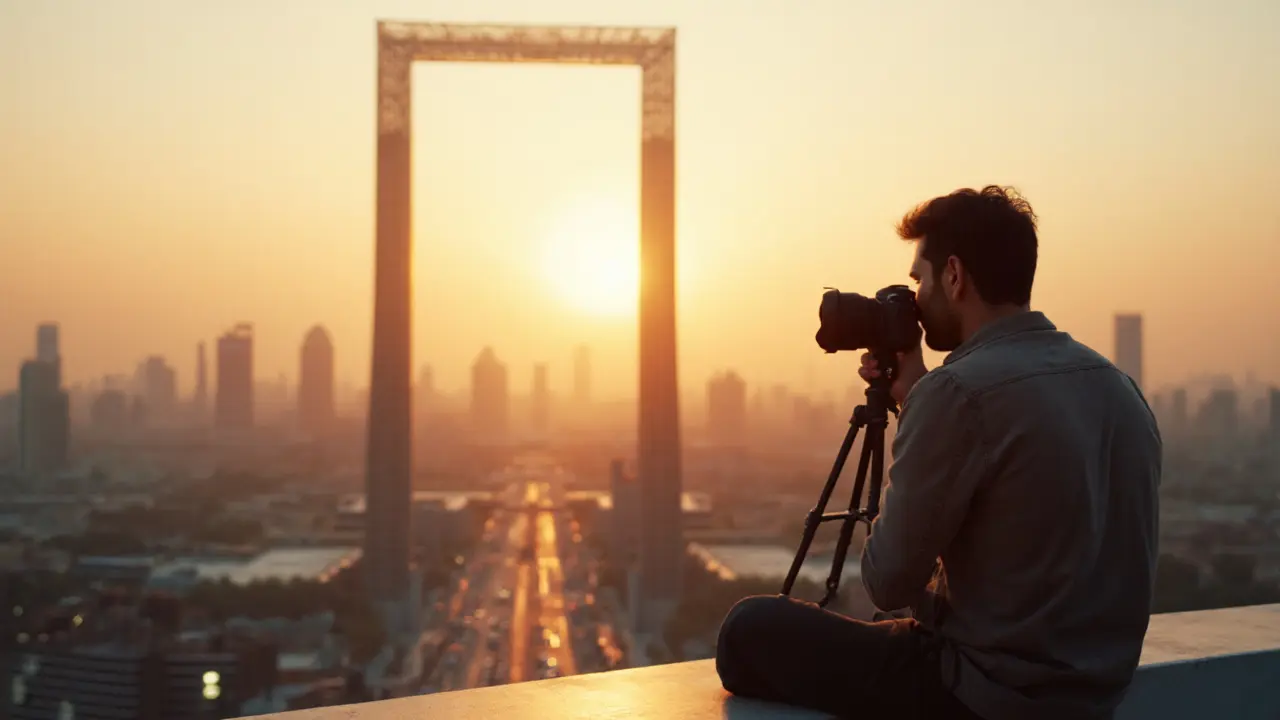
Dubai Frame is a 30‑metre‑tall, picture‑frame‑shaped observation tower that frames the historic Dubai Creek on one side and the futuristic skyline on the other. Opened in 2018, it quickly became a favourite spot for photographers chasing contrast between old and new.
Key Takeaways
- Golden hour (just after sunrise or before sunset) gives the smoothest light for framing the skyline.
- Use a wide‑angle lens (14‑24mm on full‑frame) to capture both sides of the frame in one shot.
- A sturdy tripod and remote shutter release eliminate camera shake during low‑light evenings.
- Stack multiple exposures for HDR to retain detail in both bright sky and dark foreground.
- Post‑process with a modest contrast boost to emphasize the ‘frame‑within‑frame’ effect.
Direct Answer
To get the perfect Dubai Frame shot, arrive early for sunrise, set up a tripod, shoot in RAW with a wide‑angle lens at ISO100‑200, and blend 3‑5 bracketed exposures (‑2EV, 0EV, +2EV) into an HDR image that highlights the contrast between the historic creek and the glittering skyscrapers.
Understanding the Dubai Frame’s Photographic Potential
The structure’s unique geometry acts like a giant viewfinder. The wide‑angle lens covers a broader field of view, allowing you to capture the entire frame and the city beyond in a single composition is essential. When you line up the vertical bars of the Frame with the vertical lines of Burj Khalifa or the sail‑shaped Burj Al Arab, you get a visual cue that naturally draws the eye.
Best Times & Lighting Conditions
Lighting is the single most decisive factor. Here’s a quick rundown:
- Sunrise (≈5:30am local) - Soft, warm light bathes the creek side, while the skyline stays cool, creating a colour contrast that pops.
- Golden hour (≈6:15pm) - The sun sits low behind the skyscrapers, casting long shadows that accentuate the Frame’s edges.
- Blue hour (≈7:00pm) - The sky turns deep indigo; city lights start to glimmer, perfect for night‑time silhouettes.
- Midnight - With the Dubai skyline glows with thousands of LED fixtures, you can capture dramatic light trails and reflections in the creek, but you’ll need higher ISO and a fast lens.
Gear Essentials & Camera Settings
While your smartphone can snap a decent picture, a DSLR or mirrorless camera gives you control over dynamic range. Below is a checklist of gear that consistently delivers top‑tier results.
- Tripod provides stability for long exposures and HDR bracketing, especially in low‑light conditions
- Remote shutter release prevents camera shake when pressing the shutter button
- Wide‑angle zoom (14‑24mm) or prime (16mm) with a maximum aperture of f/2.8.
- Neutral Density (ND) filter (0.6-1.2stop) for daytime long exposures.
- Extra batteries - the Frame’s observation decks are windy; you’ll be shooting for a while.
Suggested in‑camera settings (adjust based on exact lighting):
- Mode: Manual (M)
- Aperture: f/8‑f/11 for maximum sharpness across the frame.
- ISO: 100‑200 for daylight, 400‑800 for blue hour, up to 1600 for midnight.
- Shutter speed: Bracket 1/60s, 1/125s, and 1/250s for HDR; or 2‑5s with ND filter for silky‑smooth water reflections.
Composition Techniques That Make the Frame Shine
Beyond gear, composition decides whether a photo feels intentional or accidental. Try these proven tricks:
- Center‑frame symmetry - Position the Frame dead‑center and align the vertical pillars with the vertical lines of nearby towers. This creates a powerful “frame‑within‑frame” effect.
- Leading lines - Use the bridge that connects the two towers as a guide that leads the eye from foreground to background.
- Reflection shot - On calm mornings, the creek mirrors the Frame and the skyline. Place the water line at the lower third for balanced composition.
- HDR stacking - Capture three exposures (‑2EV, 0EV, +2EV) and merge them in Lightroom or Photoshop. This preserves sky detail while keeping the frame’s steel structure crisp.
- Panorama stitch - For ultra‑wide cityscapes, take overlapping shots (30% overlap) and stitch them. You’ll get a seamless 180° view that shows the full span of the Frame’s perspective.
Post‑Processing Workflow
A well‑done edit can elevate a good shot to a masterpiece. Follow this streamlined workflow:
- Import RAW files into Adobe Lightroom.
- Set white balance to ‘Daylight’ for sunrise or ‘Shade’ for sunset.
- Apply modest exposure correction (+0.2EV) to bring out the sky.
- Merge HDR images in Lightroom’s HDR module (set ‘Auto Align’ and ‘Auto Tone’ as a starting point).
- In Photoshop, sharpen the edges of the Frame using the ‘High Pass’ filter (radius 1.5px) and blend with ‘Overlay’.
- Boost contrast gently (Clarity +10, Dehaze +5) to emphasize the steel ribs.
- Crop to a 3:2 ratio, keeping the Frame at the centre and the horizon at the upper third.
Remember to keep the final file under 15MB if you plan to share on Instagram - that way the platform won’t compress it too heavily.
Common Pitfalls & How to Fix Them
- Overexposed sky - Use spot metering on the darkest part of the sky or switch to exposure compensation (‑1EV).
- Lens flare from the sun - Add a lens hood, or angle the camera slightly off‑axis while keeping the Frame centered.
- Banding in night shots - Shoot in RAW and enable long exposure noise reduction; if banding persists, try a slightly faster shutter speed.
- Distorted edges - Correct barrel distortion in Lightroom using the ‘Lens Corrections’ panel based on your lens profile.
Comparison Table: Dubai Frame vs. Burj Khalifa Observation Deck
| Aspect | Dubai Frame | Burj Khalifa Deck |
|---|---|---|
| Height | 150m | 555m |
| View Focus | Historic creek vs. modern skyline | Panoramic cityscape only |
| Best Light | Sunrise & golden hour | Evening & night |
| Crowd Level | Moderate (ticketed entry) | High (peak tourist hours) |
| Typical Lens | Wide‑angle (14‑24mm) | Standard zoom (24‑70mm) |
Related Concepts & Further Exploration
Photography at the Dubai Frame touches on several broader topics that can sharpen your skills for the next shoot:
- Architectural photography captures buildings as artistic subjects, focusing on lines, forms, and light interplay
- HDR (High Dynamic Range) blends multiple exposures to retain detail in both shadows and highlights
- Urban skyline photography focuses on the silhouette of city skylines, often during twilight or night
- Long exposure techniques for water reflections.
- Panorama stitching for ultra‑wide city views.
After you master the Dubai Frame, try the same techniques at the Burj Khalifa observation deck or the historic Al Fahidi Fort to broaden your portfolio.
Frequently Asked Questions
When is the best time to photograph the Dubai Frame?
Sunrise and the golden hour just before sunset provide the softest light and the most dramatic contrast between the historic creek side and the modern skyline.
What lens should I use for a full‑frame shot?
A wide‑angle zoom covering 14‑24mm on a full‑frame sensor is ideal. It lets you capture the entire frame and the surrounding city in one composition.
Do I need a tripod for daytime shots?
A tripod isn’t mandatory in bright daylight, but it becomes essential for HDR bracketing, long exposures with an ND filter, or night‑time panoramas.
How can I avoid lens flare from the setting sun?
Use a lens hood, keep the sun just outside the frame, or tilt the lens slightly while maintaining the Frame’s centre alignment.
Is HDR really necessary for the Dubai Frame?
HDR is highly recommended when the sky is bright and the foreground is darker. It preserves sky detail without blowing out the steel ribs of the Frame.
Can I shoot the night view without a fast lens?
A fast lens (f/2.8 or wider) helps keep ISO low and reduces noise. If you only have a slower lens, raise ISO cautiously and use noise‑reduction software in post‑processing.